Thursday, June 30, 2016

Porch Project Update

As you may remember from this post, last year we had to tear the stone off our porch skirting due to the winter ice cracking the foundation.  So, we were left with trying to decided what do replace it with.

I wanted something with a traditional farmhouse feeling, but not lattice.  We looked around our neighboring towns at houses built around the same time as ours (1880-ish) and decided on simple thin strips of wood with a wide trim around them.

We kind of worked it out as we went.

Here's what it looked like in progress:


After looking things over we realized we needed to replace the wood that wrapped around each post on the top part of the porch.  The original builders used Hardy Board which I guess is great in most applications but not meant to be placed close to horizontal surfaces that can get wet, and our porch does get pretty wet sometimes due to the direction of the weather.  So, the posts were completely rotted at the bottom. 

After about 4 days of just Ken and I working part time (I got to be the official cut girl and work the circular saw) we got everything rebuilt and the railings back on.

Then we were told it's best to let pressure treated wood sit for about a year before you paint it.  So, it sat like this since October.


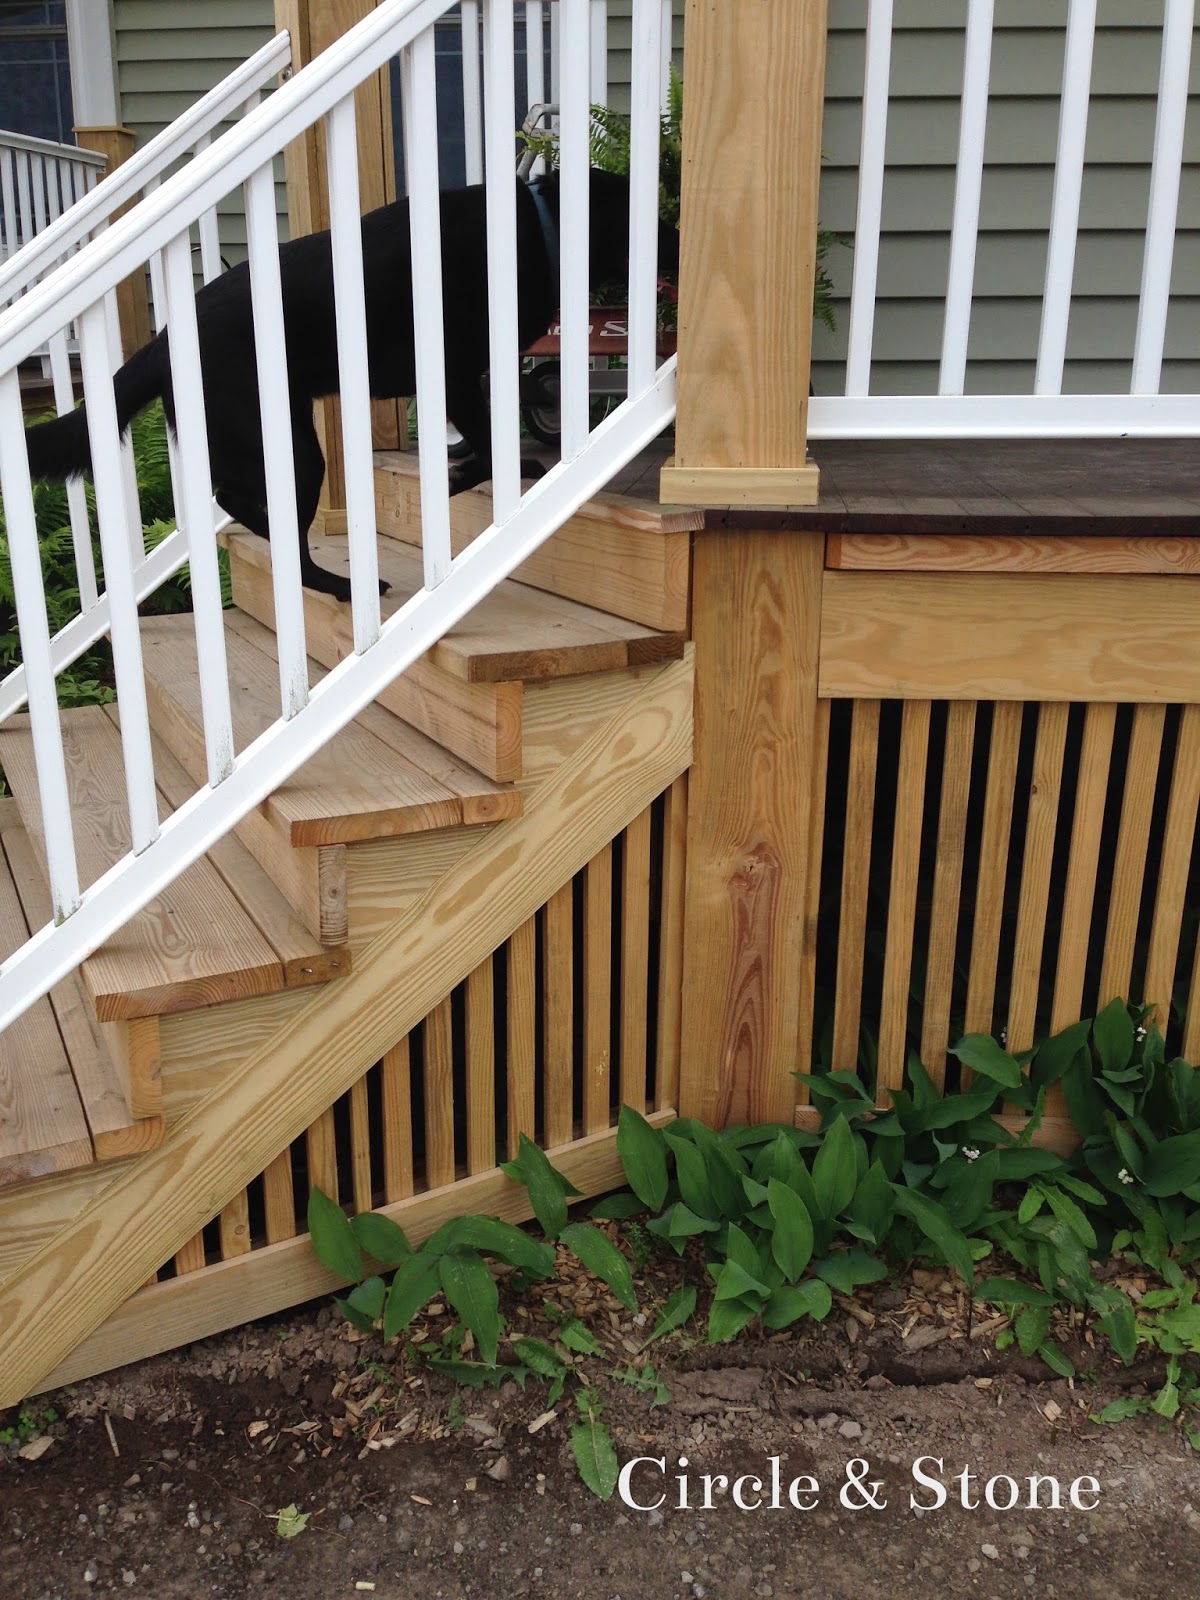
This is where we were at a few weeks ago.  I have started caulking and filling all the nail and screw holes and I got a coat of primer and paint on the side porch (below).  Now I need to get going on the front porch and then decide how we want to paint the skirting slats.  The skirting paint might have to wait until fall when I can trim the plants back to reach it.


Things are slowly moving forward around here, but at least they are moving again.  We are also working on our back patio area and new pool area as well as waiting to have our new driveway installed.  Lots going on around here and enjoying summer too!  Thanks for following along.  

Tuesday, June 28, 2016

Vintage Eclectic Chairs

Hello friends! I am back today after a month of being super busy with multiple projects happening at once (porch, pool, patio, etc. etc.) and the kids end of school year events.

While I have been busy with outdoor projects, I am always thinking about my decor indoors and what projects I hope to do when the weather gets cooler.  I would love to do some small updates in my kitchen and dining room.  Despite the fact that we just redid the dining room it could use a few tweaks.  I mean, let's face it, even when you try to plan everything there is always something you think of later once the room is really being used.

I would love to get some old/new dining room chairs.  I currently have 4 of a kind danish spindle chairs that I bought years ago unfinished and painted them myself.  The other two oak t-back chairs are from my great grandparents dining room set.  I would love a few more chairs to mix in when we extend our table for parties and holidays.  We can easily seat 10 people so we would need at least 4 more chairs.

Personally, I am not a fan of matchy-match furniture.  The more eclectic the better, so searching for vintage makes sense.  That's where Chairish comes in.  It's an online marketplace for vintage designer furniture and decor items!  You can find so many great items there, like these dining chairs.

Here are some of the chairs I found on Chairish:


This option is funky and I like the mid-century vibe.

I am not sure the color of these is quite right for my space, but how cool are they?!

These are similar to the chairs I have.

Super simple, yet funky.  These would be awesome reupholstered with mustard colored print fabric.

These feel like a sort of classic take on mid-century mod.  I would love to see these with dark 2 tone upholstery.


Love, love, love these old farmhouse chairs! The fact that each one is a different chippy paint color is just perfect!!


Another mid-century mod option.  These are so cool!


There are so many great choices available at Charish!  It really makes it hard to decide.


Here's some idea of what I envision:

Farmhouse Chairs  //  Valspar Pier 14 Paint  //  Atwell Pendant Light  //  Black Spindle Chair  //  Mali Tribal Indigo Blues Pillow  //  Kazak Fabric Pillow  //  Mulberry Tree Art  //  Taza Table Lamp


If you are in the market for anything cool and vintage check out Charish and I will hopefully be back in the next few days/weeks to post some long overdue updates on the many projects we have been working on outdoors!


SaveSave
SaveSaveSaveSave

Monday, May 2, 2016

One simple thing that changed my life...

I am going to tell you a little story.

When I was a kid I was a total slob.  I kept everything, even garbage.  I guess you could say I was a "hoarder."  I even kept week old PB&J sandwiches in old brown lunch bags under my bed so my mom wouldn't know that I didn't eat my lunch at school.  Toys were so plentiful and unorganized in my room that you could hardly see the horrible fluffy mint green carpet let alone have a place to walk on it.  At least, that is they way I remember it.

I went on like this until one day a friend of mine was over at my house playing (I was probably about 10 or 11) and she said "let's clean your room...I will help you!"

Now, of course my mom had told me many times to clean my room, but I guess I just never did it.  But, when my friend, who came from a super organized and clutter free home, said "let's clean" I thought, "okay, maybe it will be fun?!"

We spent the day (or at least a few hours) cleaning up everything in my room.  We organized the toys, cleaned under my bed - which was like a black hole for everything prior to this, cleaned my dressers, closet, etc.  I mean... we cleaned and organized everything!!

It was life changing.  I realized that day how much impact your immediate environment has on your mood and function.

Since that day I have been what some people would call sort of a "neat freak."


Clutter and disorder really does suck the life out of you whether you know it or not and whether you acknowledge it or not.  And sometimes all it takes to see it clearly is a kind friend to say "I will help you."


Make Room For What You Love, the new book by Melissa Michaels of The Inspired Room, is like that kind friend.


As most of you know I was chosen as part of the launch team for this book, which meant participating in a 5 week challenge focusing on different tasks to help pinpoint areas of my home that could be decluttered and streamlined.

The idea was to not only provide better function, but to make more room to focus on the things that matter in my life as opposed to cleaning, looking for things, picking up, etc.


It's really easy in our society to buy into the idea that we need more.  Especially when you are like me and love to decorate and make things and rearrange things and refresh things.  When it comes down to it, all that more does is take away from the other important things in life - like time with family, time to be outdoors, and time for myself.

Taking part in the challenge and reading Make Room For What You Love reminded me of these things and I am glad I could share it with you.  You can learn more about the challenge here. The book is available now on Amazon and other retailers.  Also, be sure so check out The Inspired Room.  Thank you to Melissa for letting me participate and reminding me what it means to create a simple and happy home.

Friday, April 29, 2016


When we bought this house almost 7 years ago we first came for a showing and I remember walking into the kitchen and seeing no upper cabinets or shelves and thinking where do I put all the food?!  And then we opened the pantry door.

We are so fortunate to have a walk-in pantry.  It stores all of our food and dry goods and we do a lot of canning so it provides room to store preserved foods as well.

For this week of the Make Room Challenge I gave my pantry a little bit of attention.  I took some before photos but they got deleted by accident ...oops!

Oh well.  Here is a "tour" of my pantry:


Let's start with the dutch door! It is so nice because the top half of the pantry is our spice rack so we can reach in and get what we need.  Plus, my helper likes it for playing pretend!


Inside the pantry we have lots of shelves for what we need.  In Melissa's book she writes about having different zones for different purposes and my pantry is organized with that idea in mind.  We also keep snacks within reach so the kids can help themselves more easily.


We keep our canning jar lids on a long dowel (to the right on the photo below) that is attached to the wall with a pipe clip.  I may post a tutorial on that if anyone is interested.  It keeps them very organized and they take up less space that way.


Lots of empty jars right now.  But once the garden is in and producing we fill them up with pickles, tomatoes, beets, etc.


That's it.  That's our pantry.  I love it and whenever I open it I am thankful that we have it.  

I plan to post a recap of the Make Room Challenge next week so please check back in and if you have been following along with your own projects let me know in the comments how you have been doing in your house!  Have a great weekend!

Thursday, April 28, 2016

Make Room Challenge - Week 5: Kitchen

This is the fifth and final week of the Make Room Challenge and this week the task was the kitchen.  Our kitchen is really in pretty good shape already so I basically just spiffed it up a little bit.

I made sure all the surfaces where cleared and things were put away where they needed to be.  I also rearranged a few pictures and things to refresh the space.  

Melissa writes in her book, Make Room For What You Love, about having daily tasks that help over time to build into basic habits that make it that much easier keep things in order.  I guess I have always done that but I didn't really think about it until reading the book.  I try to take time to pick up as I go along which means no need for all day clean ups!  

Here is what my kitchen looked like today:


The large double doors hide our laundry center and the next door is our bathroom (not the best location, but I hope to change that someday).  The door in the corner by the refrigerator is the pantry.


I love our pantry!  I will share more on the inside of it tomorrow.


Our kitchen is open to our sitting area (with a loft above - where I hang quilts) and dining room which I think is great when we are working in there and the kids are playing.


So, that's my farmhouse kitchen.  I hope to do some minor updates to it at some point (like real granite counters, etc) but for now just having it clean and organized feels great!  Be sure to check out the Make Room Challenge and Melissa's book Make Room For What You Love and thanks for following along on my progress. I plan to keep sharing my projects as I go so stay tuned.  

Friday, April 22, 2016

Make Room Challenge - Week 4: Play and Creative Areas

In the past week I have been working on completing the task for Week 4 of the Make Room Challenge to celebrate the launch of Melissa's book Make Room For What You Love.  

The task this week was: Play and Creative Areas.

As most of you know, I went to art school so this was not an easy task for me.  Meaning, I can think of a use for everything!  I find that most creative people are like that which makes it difficult to declutter supplies (even if you haven't used them since art school!)  

I have an entire studio dedicated to jewelry work and metal/gold smithing, but that is basically my workspace and it's outside of my home (and currently in disarray due to moves and other things).  

So, a few years ago when we put our master bedroom addition on our house and added a small coat closet under the stairs I asked Ken if we could convert our coat closet into an "art closet."  Of course he said yes (because he is awesome!)  He added a ton of sturdy shelves and then I proceeded to fill it right up.

This is how it looked:


I have tried to organize it over the last 5 years by adding things like the rolling cart from Ikea and the metal organizer on the back of the door.  But, what was missing was the simple things that make being organized easier.  Things like decluttering first and labels and stackable containers.

I really wanted to make this closet feel finished, so I decided to take everything out.  


This is the part I (and my husband) hate because it just makes a huge mess and it usually takes a few days to get the project done.


I started by priming and painting the shelves with paint we had on hand from our mudroom.  It was already so much better.


I also decided to rip out the old scrap of frayed carpet.  I found a runner that was basically the right length and I just cut it where the box is that our dryer vent goes through.  I think it came out pretty good considering what it looked like before.


I decided that all my decluttering efforts deserved some new storage bins that were clear and uniform so I could see the contents and they would stack easily and take up less space. (I ended up with a few too many so I will return some).


I spent 2 days staying up late sorting every last bead, button and paint brush and then put everything back in a way that made more sense and better utilized the space in this closet.  

This is how it came out:


I really made sure to think critically about what I would actually use.  Melissa says in her book not to save things to use someday, because let's face it "someday is not a day of the week."  That really hit home because it's so true!  While I kept most of the kids art supplies, I decided to keep things that could be used for the three most important categories to me (besides metals of course): calligraphy/drawing, knitting/weaving, and card making.  

I organized everything and with that in mind.  I also labeled the bins so I everyone is sure to know where things will go, and I made sure to put the kids stuff low enough that they can get it out and put it back on their own.   

I am really happy with the result and I think I may actually be able to do some art projects now that I can see where everything is!

If you want to join in the Make Room Challenge or get the book you can find out more here.

Next week is the final official week of the challenge, but I plan to keep going.  I have a new found purpose in my decluttering thanks to the book.  It's no longer just "getting rid of stuff" but making room for what you love so you can feel free from the burden of the things that don't matter.

Here's the final Before and After:


Related Posts Plugin for WordPress, Blogger...