Friday, April 29, 2016


When we bought this house almost 7 years ago we first came for a showing and I remember walking into the kitchen and seeing no upper cabinets or shelves and thinking where do I put all the food?!  And then we opened the pantry door.

We are so fortunate to have a walk-in pantry.  It stores all of our food and dry goods and we do a lot of canning so it provides room to store preserved foods as well.

For this week of the Make Room Challenge I gave my pantry a little bit of attention.  I took some before photos but they got deleted by accident ...oops!

Oh well.  Here is a "tour" of my pantry:


Let's start with the dutch door! It is so nice because the top half of the pantry is our spice rack so we can reach in and get what we need.  Plus, my helper likes it for playing pretend!


Inside the pantry we have lots of shelves for what we need.  In Melissa's book she writes about having different zones for different purposes and my pantry is organized with that idea in mind.  We also keep snacks within reach so the kids can help themselves more easily.


We keep our canning jar lids on a long dowel (to the right on the photo below) that is attached to the wall with a pipe clip.  I may post a tutorial on that if anyone is interested.  It keeps them very organized and they take up less space that way.


Lots of empty jars right now.  But once the garden is in and producing we fill them up with pickles, tomatoes, beets, etc.


That's it.  That's our pantry.  I love it and whenever I open it I am thankful that we have it.  

I plan to post a recap of the Make Room Challenge next week so please check back in and if you have been following along with your own projects let me know in the comments how you have been doing in your house!  Have a great weekend!

Thursday, April 28, 2016

Make Room Challenge - Week 5: Kitchen

This is the fifth and final week of the Make Room Challenge and this week the task was the kitchen.  Our kitchen is really in pretty good shape already so I basically just spiffed it up a little bit.

I made sure all the surfaces where cleared and things were put away where they needed to be.  I also rearranged a few pictures and things to refresh the space.  

Melissa writes in her book, Make Room For What You Love, about having daily tasks that help over time to build into basic habits that make it that much easier keep things in order.  I guess I have always done that but I didn't really think about it until reading the book.  I try to take time to pick up as I go along which means no need for all day clean ups!  

Here is what my kitchen looked like today:


The large double doors hide our laundry center and the next door is our bathroom (not the best location, but I hope to change that someday).  The door in the corner by the refrigerator is the pantry.


I love our pantry!  I will share more on the inside of it tomorrow.


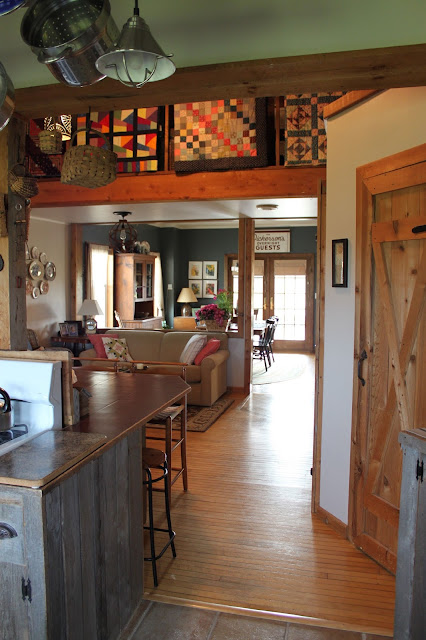
Our kitchen is open to our sitting area (with a loft above - where I hang quilts) and dining room which I think is great when we are working in there and the kids are playing.


So, that's my farmhouse kitchen.  I hope to do some minor updates to it at some point (like real granite counters, etc) but for now just having it clean and organized feels great!  Be sure to check out the Make Room Challenge and Melissa's book Make Room For What You Love and thanks for following along on my progress. I plan to keep sharing my projects as I go so stay tuned.  

Friday, April 22, 2016

Make Room Challenge - Week 4: Play and Creative Areas

In the past week I have been working on completing the task for Week 4 of the Make Room Challenge to celebrate the launch of Melissa's book Make Room For What You Love.  

The task this week was: Play and Creative Areas.

As most of you know, I went to art school so this was not an easy task for me.  Meaning, I can think of a use for everything!  I find that most creative people are like that which makes it difficult to declutter supplies (even if you haven't used them since art school!)  

I have an entire studio dedicated to jewelry work and metal/gold smithing, but that is basically my workspace and it's outside of my home (and currently in disarray due to moves and other things).  

So, a few years ago when we put our master bedroom addition on our house and added a small coat closet under the stairs I asked Ken if we could convert our coat closet into an "art closet."  Of course he said yes (because he is awesome!)  He added a ton of sturdy shelves and then I proceeded to fill it right up.

This is how it looked:


I have tried to organize it over the last 5 years by adding things like the rolling cart from Ikea and the metal organizer on the back of the door.  But, what was missing was the simple things that make being organized easier.  Things like decluttering first and labels and stackable containers.

I really wanted to make this closet feel finished, so I decided to take everything out.  


This is the part I (and my husband) hate because it just makes a huge mess and it usually takes a few days to get the project done.


I started by priming and painting the shelves with paint we had on hand from our mudroom.  It was already so much better.


I also decided to rip out the old scrap of frayed carpet.  I found a runner that was basically the right length and I just cut it where the box is that our dryer vent goes through.  I think it came out pretty good considering what it looked like before.


I decided that all my decluttering efforts deserved some new storage bins that were clear and uniform so I could see the contents and they would stack easily and take up less space. (I ended up with a few too many so I will return some).


I spent 2 days staying up late sorting every last bead, button and paint brush and then put everything back in a way that made more sense and better utilized the space in this closet.  

This is how it came out:


I really made sure to think critically about what I would actually use.  Melissa says in her book not to save things to use someday, because let's face it "someday is not a day of the week."  That really hit home because it's so true!  While I kept most of the kids art supplies, I decided to keep things that could be used for the three most important categories to me (besides metals of course): calligraphy/drawing, knitting/weaving, and card making.  

I organized everything and with that in mind.  I also labeled the bins so I everyone is sure to know where things will go, and I made sure to put the kids stuff low enough that they can get it out and put it back on their own.   

I am really happy with the result and I think I may actually be able to do some art projects now that I can see where everything is!

If you want to join in the Make Room Challenge or get the book you can find out more here.

Next week is the final official week of the challenge, but I plan to keep going.  I have a new found purpose in my decluttering thanks to the book.  It's no longer just "getting rid of stuff" but making room for what you love so you can feel free from the burden of the things that don't matter.

Here's the final Before and After:


Thursday, April 14, 2016

Make Room Challenge - Week 3: Clutter and Entry PART 2

So, yesterday I showed you my relatively organized command center.  Today, I wanted to share my mudroom.

The mudroom..UGH!!!  I look at photos of mudrooms and dream about what it would be like to have a beautiful mudroom with things like; a huge closet, or a dog washing station, gorgeous built-ins, or a lovely potting sink.  Let's face it, that is not a reality for this house right now.

However, we can always do some simple things to try and make the best of the space we have.

I spent some time this week as part of the Make Room Challenge, to declutter and clean up our mudroom.

Here is what it looked like before:


Okay, okay, not super terrible on the surface, but behind closed doors it was a bit worse.  Our mudroom serves many purposes including: art display area, coat closet, dog house, work out area, sporting equipment storage, food storage (freezer), basement access, and house project "stuff" zone.

As the first room you enter into our house, it would make sense that this room would be the most important space to whip into shape so when guests come over we could give a better first impression of our home.  Actually, for our own sake as well.  Why shouldn't we deserve to come home to an organized and tidy mudroom?

So, I spent the day opening cabinets and sorting things out and trying to decided if I really need to keep ice skates I wore 20+ years ago, and only once since then?!

This is how it came out:


The first, and most obvious thing I did was put little things away where they belonged and cleaned everything.  Although I don't agree with it, my husband insists on keeping multiple coats on hooks in the mudroom and that is a battle I am not willing to fight since at least they are getting hung up somewhere!  We have this nice coat hook/basket combo shelf that came from Ikea way back when.  We keep hats and dog leashes and toys in the baskets.  My husband's shoes go in the matching storage bench since they are too big to fit in the red cabinet that we keep the rest of our shoes in.  Hooks on the wall below the window are just the right height for the girls' book bags.


I brought in a bit of color with an oxalis plant that is still holding on from St. Patrick's Day.


Another area that I put some real effort into was our shoe cabinet.  This cabinet was an old jelly cabinet from Ken's grandmother's house.  I used to keep it almost empty with just a few items in our upstairs hallway, until one day I realized it would be great for our shoes! That's the funny thing; sometimes you just need to look at pieces of furniture you already have and see if you can envision using them in a different location or for a different purpose.  I got rid of 6 pairs of shoes in 5 minutes!  It becomes really easy to eliminate clutter when you just get real with yourself about what you have and what you need.


We keep our dress shoes in boxes in our closets and get them out when we need them.  So, this cabinet only really needs to hold a few everyday pairs per person.

Here is what the inside of that cabinet looks like now:


We keep some of our overflow flip flops and crocs in a basket on top of the cabinet.


The other basket on top of the cabinet holds various hats.


We have some old lockers that hold sports equipment and umbrellas and such.  They were pretty cluttered up.  So much so, that I had to push the stuff in and then quickly slam the door!


I added a hanging clothes rail and inexpensive cloth cube organizer to create "cubbies" for the smaller  items that needed to be stored in here.


Lastly, I took all the magnets and pictures off of our freezer.  I love seeing my kids art work and I am sure we will put more up in no time, but it was a nice break for a minute.  I did keep the girls' chore chart and message board on the side of the freezer.  I also removed all the paint cans and tools from the top of the freezer and put them away where they go.  The basket on the top of the freezer is for items that need to go to be donated (it's bigger than it looks in the photo).  When it's full, I just take it to Goodwill.


And, this is maybe controversial to some people, but I made a sign a while ago for my mudroom that says "Please Remove Your Shoes."  We are a no shoes in the house family.  It's hard enough to keep the house clean without the dirt from shoes.  So, our shoes and guests shoes stay in the mudroom.


This mudroom clean up was part organize, part declutter and part clean up and just put things back where they belong!  It is nice and fresh and clean feeling now; just in time for the warmer days ahead.

Thanks for following along with my progress in the Make Room Challenge.  Why not join in now and make some room in your home as well.  You can find out more here.

Related Posts Plugin for WordPress, Blogger...